
There are a lot of resources available about UICollectionView since the release in iOS 6.0. But most of them use the somewhat basic layout features with UICollectionViewDelegateFlowLayout. It for example only allows you to scroll horizontally or vertically. But what if you want both? What if you have an advanced and dynamic layout? That’s where UICollectionViewLayout comes in to play.
This is a short guide to help you understand UICollectionViewLayout. I suggest you check out UICollectionViewWaterfallLayout on GitHub after reading this. It covers all the basics that you’ll need to get started with UICollectionViewLayout.
I’ve also created a sample Xcode project (see screenshot above) that implements UICollectionViewLayout. Get it here.
UICollectionViewLayout
UICollectionViewLayout has a different flow compared to UICollectionViewDelegateFlowLayout, which is similar to UITableViewDelegate where you for example provide heights for the cells and more.
You need to provide the position and the size for each item when you use UICollectionViewLayout. You do this by providing UICollectionViewLayoutAttributes inside UICollectionViewLayout for each item in your collection view.
UICollectionViewLayoutAttributes
An UICollectionViewLayoutAttributes object manages the layout-related attributes for a given item in a collection view. Layout objects create instances of this class when asked to do so by the collection view. In turn, the collection view uses the layout information to position cells and supplementary views inside its bounds.
UICollectionViewLayoutAttributes is the only object that determines the size and position of the cell. You should not confuse this with your UICollectionViewDataSource which should only set the content for the cell. It’s important to separate these two.
Implementation of UICollectionViewLayout
The first thing you’ll need to do is to subclass UICollectionViewLayout and connect it with your collection view. You can do this in UICollectionView’s init method initWithFrame:collectionViewLayout.
To get the basics to work you need to at least override these three methods in your UICollectionViewLayout subclass:
collectionViewContentSizelayoutAttributesForElementsInRect:layoutAttributesForItemAtIndexPath:
You return the contentSize in the first method and the UICollectionViewLayoutAttributes in the last two methods. You could calculate the attributes for an item ‘on-the-fly’ but UICollectionViewLayout comes with a method called prepareLayout where it gives you a chance to pre-calculate the attributes for all items inside the collection view.
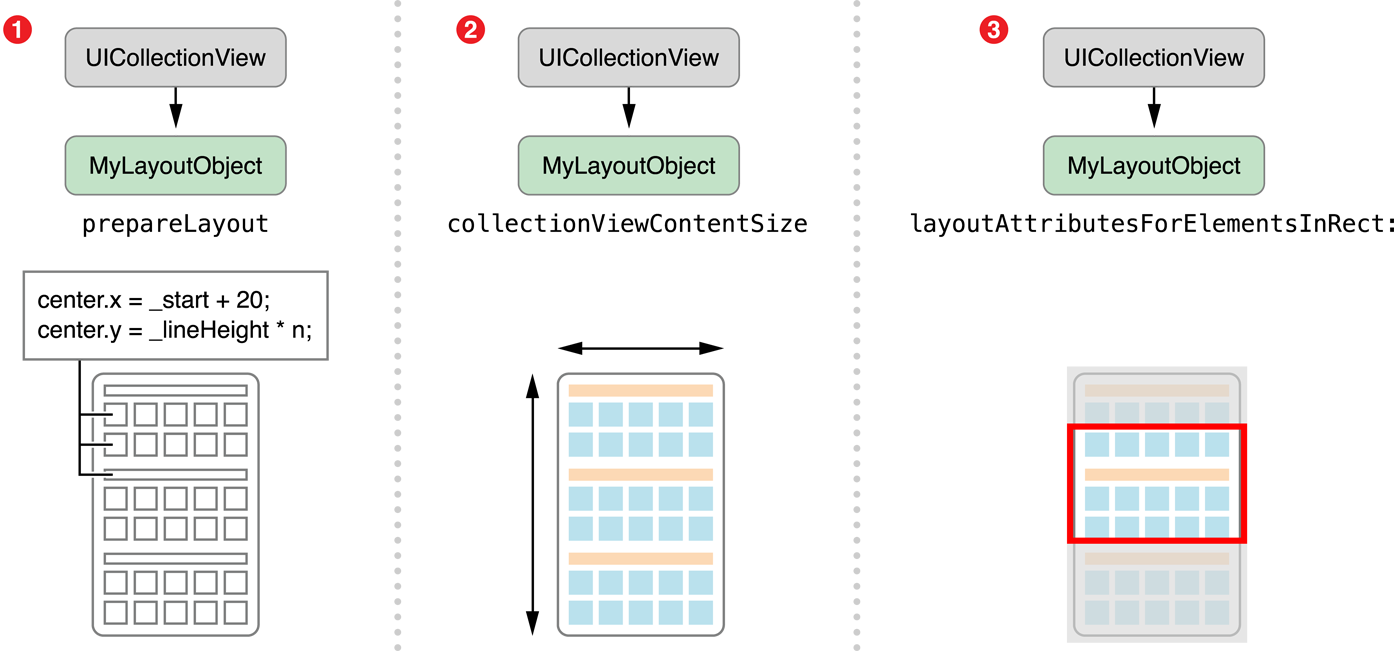
prepareLayout
UICollectionView will call prepareLayout when the collection view presents itself for the first time and each time the layout is invalidated (you can manually invalidate the layout by calling ‘invalidateLayout’ on the UICollectionViewLayout).
During each layout update, the collection view calls this method first to give your layout object a chance to prepare for the upcoming layout operation.
You should use prepareLayout to calculate the attributes for all your items and store these calculated attributes somewhere in your UICollectionViewLayout subclass so you can return the attributes when UICollectionView calls layoutAttributesForElementsInRect: or layoutAttributesForItemAtIndexPath:.
Horizontal and vertical scrolling
During the implementation of UICollectionViewLayout you are entirely responsible for the contentSize of the UICollectionView. Since you are pre-calculating all the attributes in prepareLayout you also know how big the content size will be. Simply provide a width and height that’s larger than the UICollectionView bounds to enable both horizontal and vertical scrolling. There’s an example in my example project.
Some resources
- WWDC 2012 Video: Advanced Collection Views and Building Custom Layouts
- Creating Custom Layouts (Apple Docs)
- UICollectionViewWaterfallLayout on GitHub
Also check out my example project to get you started.